Category Archives: Repairs

iPhone 5 Loudspeaker Repair

iphone_5_repairs_speakerWith all this talk and speculation on the next iteration of Apple’s iconic iPhone 5, the iPhone 5 rumors are coming loud and clear through your speaker. Are they not? Then it’s the perfect time to get those faulty speakers repaired!

Segue.

If you have any troubles with your iPhone 5 speakers such as intermittent sounds coming through or distorted sounds then give our tried and true loud speaker repair service a try. We’ll get such problems sorted promptly so you can get back to enjoying Apple’s latest phone.

iPhone 4 Home Button Repair

iphone_4_home_button_repair

Your iPhone 4 may be getting to that age now where some components are getting a little warn out. One of the most common faults is the home button breaking.

There is a temporary fix that you can do that will keep your iPhone 4 functional by adding a virtual home button to the screen.


Enabling Virtual Home Button

Step 1

IMG_0002Navigate to Settings.


Step 2

From here, touch General.
IMG_0003


Step 3

IMG_0004

Touch Accessibility.


Step 4

Finally turn AssistiveTouch “On”.

This will keep you going for a while but time will come when you cant put up with it anymore or you want to sell it. Having a fully working iPhone 4 will add value to your iPhone and will help you sell it faster. Our iPhone 4 home button repair has a 12 month warranty and we only use top quality replacement parts. We offer a friendly and fast service and have many returning customers.

Expanded iPhone 3GS Battery

Exbanded_3gs_batteryWe often see this in our workshop. It looks very worrying initially. The screen is often popping out and there is often warping of the logic board.

But in our experience the logic board is fairly hardy and replacing the battery normally sorts things out. The iPhone 3GS pictured above obviously needed a new iPhone 3GS rear case. But to my surprise with a new battery and a new rear case it working like a dream.

You do have to be a little more careful when doing the battery replacement yourself when the battery is swollen. This is because:

  • There is a build up of pressure. So when undoing screw and clips there is an increased possibility of screws or components flying out. I would recommend some sort of eye protection.
  • Due to the logic board often being warped it this situation, it often makes it a lot more difficult to get it out and even more so getting back in. The screw holes can be difficult to line back up for the same reason.
  • There is always a risk when working on electrical devices as so many things can go wrong. If you are in any doubt it probably best to get a professional to do it.

For a guide on changing the battery in an iPhone 3GS please read our post on the subject.


Our iPhone 5 Screen Repair Service

When do I Need to Replace My iPhone 5 Screen?

You will need to replace your iPhone 5 screen if…

iphone_5_SCREEN_repair

  • … the screen is cracked. It is very highly recommended to get your screen replaced as the glass often splinters and can lodge in your fingers or thumb.
  • … there are dead pixels, black ink spots or bleeding on the screen.
  • … your screen might doesn’t turn on but your iPhone 5 still boots up.

Are the Parts You Use Official?

Yes. We only fit the official iPhone 5 screen.

Is My iPhone 5 Safe With You?

We have a highly skilled team of technicians with many years of experience. We started repairing the very first iPhone when it came out many moons ago. Even before that we gained a very good reputation repairing PDA’s.

We are very confidant in our abilities and in the unlikely event we cause any damage to the phone we will replace it for you.

Will You Price Match if I Find the Service Cheaper?

Yes we will price match providing it is from a VAT registered company that is not just someone repairing phones from their bedroom.

We are a VAT registered company that has been running for 11 years with permanent offices based in Leicester. We have a manned telephone 9am – 5pm Mon-Thurs and 9am – 4.30pm on Fridays (excluding bank holidays).

Changing The Rear On An iPhone 4

title_pic_broken_iphone_4_rear

So you’ve broken your iPhone 4 rear. If ever there was a time to fix something for yourself then this is the time.

This repair is very strait forward and can save you quite a few pennies.

What You Need:

iPhone 4 Mini Torx 5 Sided Pentalobe Screwdriver

And either:

Black Rear Case White Rear Case

Changing and iPhone 4 Rear

Step 1

Step_1

Undo the two screw at the bottom of the phone with the Mini Torx screwdriver.


Step 2

step_2

Slide the rear chase up using you thumbs. It should move a couple of mm’s. Gently lift the rear case off from the top.


Step 3

rear_fitted_iphone_4

Put the new case on in the same position the old one came of. Then slide it down into the to its final position and put the screws back in. Simple.

Changing An iPhone 3GS Battery

You May Need to Replace Your iPhone 3GS if…

  • … your battery is running out faster than normal.
  • … your phone is charging quicker than normal.
  • … your iPhone frequently crashes.

A Word Of Warning

Apple did not make replacing the battery a simple task. It will take a little time to complete and please remember things can go wrong and you can damage your iPhone. If you are not confident in undertaking this task of iPhone battery replacement please get a professional to undertake the procedure. Just give us a call on 0116 2866447 and we can help.

Not sure what iPhone you have? Check our iPhone comparison guide.

If you are feeling confident read on.

What You Will Need:

Cheap iPhone 3GS Battery UK

A new iPhone 3GS Battery An iPhone 3GS Opening Tool Set

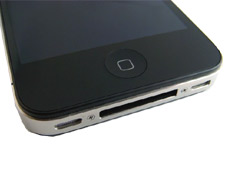
Replacing Your iPhone 3GS Battery
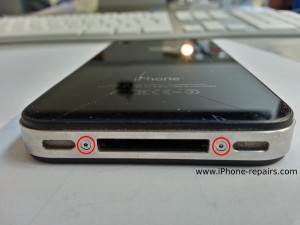
Step 1

Undo the 2 screws a the bottom of the iPhone 3GS using the small Philips (cross head) screw driver.


Step 2

Place the screen removal sucker on the lower part of the screen near the home button and slowly lift the screen open. Hinge the screen upwards from the home button, with the hinge point being the upper edge of the screen near the power button, use your other hand to limit how far it opens.


Step 3

Once the iPhone screen is opened you will see 3 ribbons connecting the screen to the logic board. They are labeled 1, 2 and 3. Using a small flat headed screwdriver gently pop the ribbon connectors marked 1 and 2  from the logic board.


Step 4

Ribbon cable 3 is a little different it has a little locking bar you have gently flick to the upright position, once in the upright open position the sensor ribbon cable 3 can then just be slid out.


Step 5

Next remove the SIM tray by using an Apple SIM card ejector or a paper clip. Then pop off the connectors in order. These are numbered 4 5 6 7.


Step 6

Now you will need to remove the screws as labeled in the picture. Be careful as the screw holding the camera marked number 1 on the above image has a small metal clip that needs to be removed as well.

The screw marked number 5 is underneath the warranty sticker. This will be damaged during this procedure and the Apple warranty will be voided. This iPhone 3GS is over 12 months old so is no longer covered under the manufacturer’s warranty.


Step 7

Gently pop out the camera by levering under the bottom edge of the camera that is attached to the rear of the logic board. Then gently leaver the logic board out from the bottom.


Step 8

Using the plastic spudger tool and the plastic tab, pry the iPhone battery from the back case. This can be difficult as the adhesive backing on the iPhone battery can be quite strong.


Step 9

Now place the new iPhone battery into the rear case. The new iPhone battery has a sticker on the back. The protective layer just need to be peeled off. Assembly of the iPhone is just a matter of repeating the above steps in reverse order.

We hope this is a help to all of you iPhone battery replacement DIYers out there.

iPhone Repairs And Me

To all iPhone users with broken screens, cracked casings, water damage, iOS software failures, sync, charging issues or any other fault related to the Apple’s iconic iPhone.

My fellow iPhone fans. It is not your fault that your iPhone is not feeling to well. Lady Luck is not always on our side and now your iPhone now needs some high quality TLC.

I have been an avid iPhone user since the very first model appeared on the scene. I am a tech nerd and as such must be at the forefront of new technology. This is all well and good until something happens to your much beloved treasure… Like dropping it!

My first thought was to take it to Apple. They were friendly, but the price wasn’t. I went through several stages of emotion. Anger, regret, denial and back to anger. Then I decided to learn all I could about these magnificent devices inside and out so that I could fix it myself.

My friends were soon impressed with the quality of my repair work and asked me to fix their iPhones. Word soon got around and I started work at iTECH Repair Ltd. These talented technicians have been doing repairs on PDA’s and Smartphones for many years. Our combined experiences soon helped us to grow into a company that can offer affordable and fast iPhone repairs in the UK at the same quality as an in house Apple repair.

You don’t have to to pay for premium repair prices. There is a better way.

We can fix your iPhone no matter what the problem is. Our turn around is normally 1-3 working days and we offer free fully insured return postage on all repaired iPhones. Please be rest assured that the quality of our work is the best in the UK. We are so confident in fact that we offer a full 12 month warranty on all repairs.